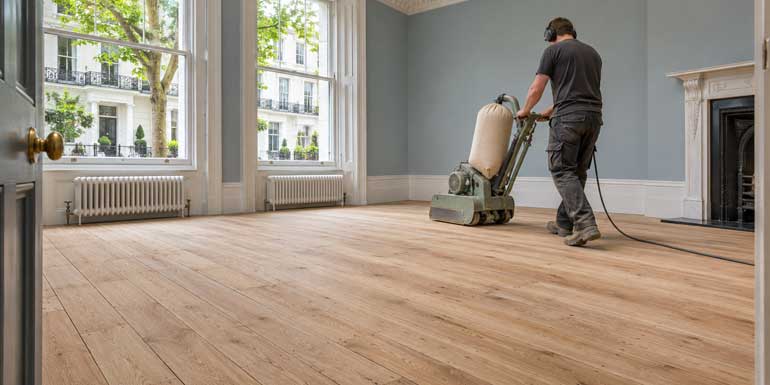
Many Chelsea homes, particularly in SW3 and SW10, still have their original Victorian and Edwardian floorboards. Over the years they pick up scratches, stains and a dull, worn finish, but the timber underneath is usually in good shape. Professional sanding strips the damaged surface and brings back the natural grain and colour, which is why it’s almost always better than replacing the floor.
This guide covers what sanding involves, how the process works, which finish to choose, how different floor types are handled and how to prepare your home.
Why Chelsea Homeowners Choose Floor Sanding
People usually sand their floors for one of these reasons:
- Worn or dull finish after years of foot traffic
- Scratches, stains and marks that cleaning can’t remove
- Preparing a property for sale or rent
- After building work, when boards are marked with paint, plaster or old adhesive
- A change of look, such as moving from dark varnish to a lighter natural oil
Sanding creates a smooth, even surface and lets you choose a new finish and colour. It also lets you deal with small repairs and gaps in the same visit. If you’d like to see what’s involved, take a look at our wood floor sanding service.
How Much Does Wood Floor Sanding Cost?
Sanding is priced per square metre, and in Chelsea sanding, buffing and finishing a wood floor starts from £25 per m². Gap filling, staining and repairs are priced on top, and the final figure depends on the condition of the floor, the wood type and the finish. Our guide to floor sanding costs in Chelsea covers typical prices by room size and what affects your quote.
The Wood Floor Sanding Process
Professional sanding follows three stages.
Stage 1: Assessment and Preparation
The sander inspects the boards for damage, gaps, protruding nails and uneven areas. Loose boards are secured, nails are punched below the surface and any repairs are agreed with you. The working area is then protected and separated from the rest of the home to limit dust.
In period properties this stage matters most. Skirting boards, picture rails and other original features need protecting, and old boards can be uneven, so the operator has to adjust their approach room by room.
Stage 2: Sanding
The floor is sanded in passes, starting with a coarse abrasive to remove the old finish and surface damage, then moving to finer grits for a smooth, even surface. Edges and corners are completed with smaller machines and by hand.
| Pass | Purpose |
|---|---|
| Coarse | Removes old finish, stains and major marks |
| Medium | Smooths the surface and removes coarse scratches |
| Fine | Prepares the wood to take the finish evenly |
Machines connect to dust extraction, which reduces the dust in the air, though some fine dust can still escape into adjacent rooms. Skipping a pass or rushing the sequence is how drum marks and swirl patterns end up in the finished floor, so each stage needs time.
Stage 3: Finishing
The finish protects the timber and sets the final look. Lacquer is applied in coats, with drying time between each. Oils are worked into the wood and left to cure. Your sander will tell you when the floor is safe to walk on and when furniture and rugs can return.
Choosing the Right Finish
| Finish | Best for | Things to consider |
|---|---|---|
| Lacquer (varnish) | Busy family homes, hallways and kitchens | Hard-wearing and easy to clean. Choose from matt, satin or gloss |
| Hard wax oil | Period homes and a natural look | Enhances the grain, easy to spot-repair, needs periodic maintenance coats |
| Stain plus finish | Changing or evening out colour | Samples on a sanded area help you judge the shade |
We use brands such as Junckers, Bona and Osmo, and free finish samples are included so you can see the colour on your own boards before you decide.
A few points help you choose:
- Think about traffic. Hallways and family rooms suit a hard-wearing lacquer.
- Think about maintenance. Oil needs occasional maintenance coats, but it’s easy to touch up.
- Think about light. A matt finish hides marks and softens reflections, while gloss shows every mark.
- Test before you commit. Timber and stain look different from the sample board once they’re on your floor.
Wood Floor Sanding or Recoating?
Not every floor needs full sanding. If the finish is lightly worn but intact, and the exact lacquer or oil is known, a recoat can refresh it for much less. Full sanding is the better choice when you have:
- Deep scratches or stains in the wood
- A finish that has worn through to bare timber
- Uneven colour across the floor
- Old, damaged or unknown coatings
- A wish to change the colour or finish
What About Engineered and Parquet Floors?
Solid hardwood is the simplest to sand. Other floor types need different handling:
- Engineered boards have a thin top layer of real wood, so the wear layer thickness decides how much can be removed. We offer engineered wood floor sanding with the depth judged board by board.
- Parquet and herringbone blocks run in different grain directions and need careful control, and our parquet floor sanding service covers this type of floor.
How to Prepare Your Chelsea Home for Floor Sanding
A little preparation keeps the job smooth and fast.
- Clear the room of furniture, rugs and belongings before the team arrives
- Take down curtains and wall hangings in the working area
- Close internal doors to limit dust spreading
- Cover soft furnishings in nearby rooms
- Tell your neighbours, especially in terraced houses and mansion blocks
- Check parking arrangements, since many SW3 and SW10 streets have restrictions
- Mention underfloor heating at the survey, because it affects the schedule
Frequently Asked Questions
How long does wood floor sanding take?
A typical room takes one to two days to sand, and larger properties take longer. Finishing adds drying time between coats, and the floor then needs time to cure before heavy furniture and rugs go back. Your sander will give you a timeline at the survey.
Can all wood floors be sanded?
Most solid wood floors can. Engineered boards depend on the thickness of the top layer, and parquet needs specialist handling. A survey will tell you what’s possible for your floor.
Will floor sanding make a lot of dust?
Sanding always creates dust, but professional machines are connected to extraction, and the working area is sealed off from the rest of the home. Some fine dust may still settle nearby, so cover soft furnishings.
Can I sand a floor with underfloor heating?
Often yes, but the heating usually needs to be switched off before the work and brought back gradually afterwards. Tell your sander about it when you book.
How often does a wood floor need sanding?
It depends on traffic and the finish. Good care and occasional recoating can extend the time between full sandings by many years.
Is it worth sanding or should I replace the floor?
If the boards are sound, sanding is usually far cheaper than replacement, and it keeps original timber that is often impossible to match.
Get a Free Quote for Floor Sanding in Chelsea
We offer free quotes and site visits across SW3 and SW10, with free finish samples so you can choose the right look for your floor. You can see examples of recent work in our portfolio. Request a free quote or call us on 020 7036 0624.